
How to assemble your Takacat - with videos!
Getting your Takacat out of the bag and into the water takes just a few simple steps. Before you decide to buy this innovative, portable boat, you may be curious about what it takes to assemble it.
This article will help you get familiar with the general assembly of any Takacat LX model.

Each Takacat comes with a detailed and illustrated user manual downloadable here.
Summary of Takacat Assembly
Note: The 260, 300 and 340 LX models have one air chamber per tube; the 380 and 420 LX models have two air chambers per tube.
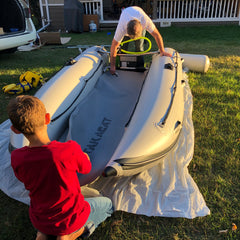
1. Remove your Takacat from the carry bags and unfold.
2. Pump up the air chamber(s) for each tube, max 3 PSI.

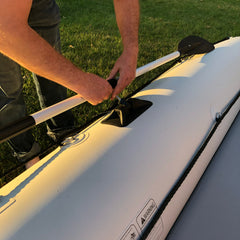
3. Assemble the transom bar, first the lower then the upper bar. Use water to lubricate the bar for easier insertion.
4. Sandwich the transom into the transom bars using the provided washers bolt and eye-nut.
5. Insert, fasten at the front with a strap, and inflate the floor to 10PSI.
6. Assemble each oar and install onto the boat.
8. Attach quick release wheels to bottom transom bar (sold separately)
9. Attach quick release rod holders to top transom bar (sold separately)
Here's a more detailed look at how to assemble your Takacat:
If you still have questions, reach out to us!
The team at Boat Shop Canada

Is there a video showing how to get it back in the bag??